I need to be honest, not so much information around about how to integrate Burp Suite with Microsoft DevOps or TFS, this is why I am writing this article.
Burp suite is a top platform for penetration testing, we can use it for a lot of different scopes, for people working in cybersecurity Burp Suite is a must to have.
Burp Suite offers three versions, Free, Professional and Enterprise, Burp Suite also provides integration for automation testing with Selenium and Jenkins, check below
What about Microsoft stack, the last version of Burp Suite offer the possibility to expose some API to trigger some events like scanning and retrieve information.
Below how to do that.
First, we need to install Burp Suite Professional edition from here
Form users option enable the API and select the bind address, in this case I selected all interfaces, in this way I can test using my machine name as well.
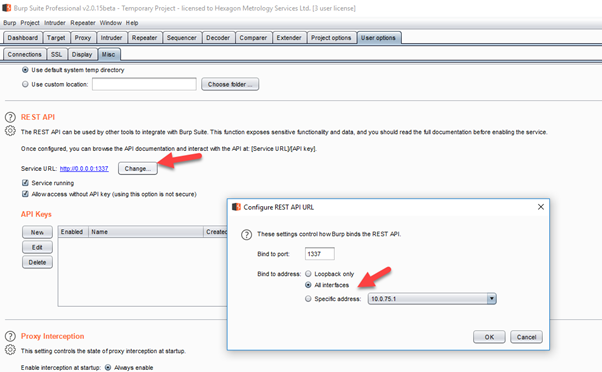
Open a browser and navigate to

Below a quick example about how to trigger the Burp Suite API using C#
I put the picture as a quick reference, nothing complicates with that, just an HTTP call, you can download the example below
https://drive.google.com/file/d/10ZaNNCh0VZQs7H6q1Tqpk0MNzoYUByvS/view?usp=sharing
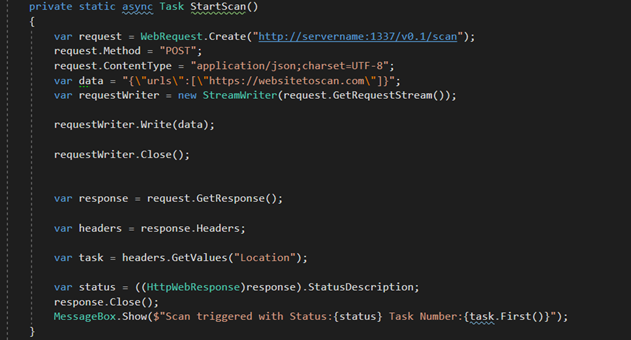
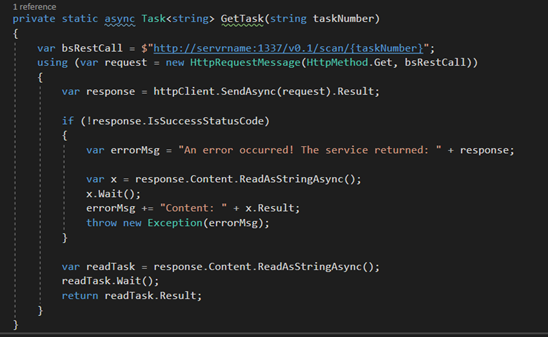
The code below returns the scan status and the task number in the HTTP header (not sure why it is named Location)
We can trigger these actions from any type of code or scripting, this is why I think this is the best solution to use for Microsoft Platform.
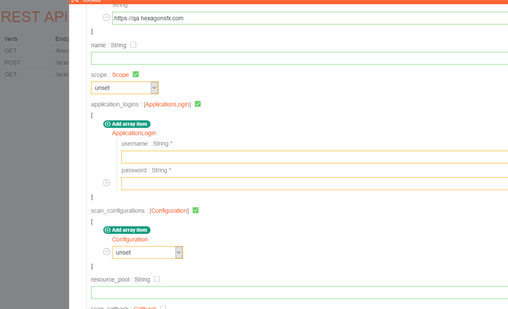
There is also the option to use, like the login parameters, configuration name or the scope we want to use, so I think pretty cool stuff to use.
About the Burp Suite installation, we can use a dedicated VM in Azure or a Docker image with Kali and Burp Suite.
If you decide on the Docker way you can use the steps below:
Install Docker, if you use Windows download from her
https://docs.docker.com/docker-for-windows/
If you use Linux from apt-get as below
apt-get install docker.io
docker run hello-world
Create the Docker container, if you like Ubuntu use below
docker run -ti –name burprestapi -h burpapi -p 8090:8090 -p 8080:8080 ubuntu:latest /bin/bash
if you like Kali use below
docker run -ti –name burprestapi -h burpapi -p 8090:8090 -p 8080:8080 kalilinux/kali-linux-docker /bin/bash
Download the Burp Suite installation for Linux x64 from here
In the Docker container enter in the opt folder
Copy the .sh installation file, from the container execute the command below
docker cp burpsuite_pro_linux_v2_0_15beta.sh burprestapi:/opt/
And install Burp Suite as below
bash burpsuite_pro_linux_v2_0_15beta.sh
Enter in the Burp Suite folder
root@burpapi:/opt# cd BurpSuitePro/
Execute the installation
root@burpapi:/opt/BurpSuitePro# ./BurpSuitePro
Accept the license, enter the key and you now have a Burp Suite instance running in a Docker container.
This is very interesting for the automation testing scenario, because we are much more dynamic and scalable.
The Docker option is also convenient, we can execute the container everywhere.
I am always happy and available for questions and chat, feel free to contact me by email or other social channels.